Introduction
For years I ran a personal WordPress blog, but grew tired of the platform’s security problems. If you don’t really stay on top of applying the latest updates, then your chances of getting hacked climb exponentially over time. So for awhile, I switched to Hugo, a Markdown-based static site generator. But themes were a huge pain, and I found that I simply didn’t enjoy working with Markdown as much I did the cloud-based WordPress rich editor. The next thing I knew, it had been nearly three years since I had published anything!
So I decided to migrate back to WordPress. But in the meantime, I started working a lot with Docker and container orchestration in my software development career. So I thought that perhaps this time around, why not run WordPress as a Docker container? In theory, this would expose less surface area to attackers, and provide the advantages of an ephemeral installation. Your container’s been compromised? Just nuke it! Run a new one, from the latest image with the latest security patches.
Unfortunately, while the Internet is full of tutorials (e.g. 1, 2) for running WordPress with Docker, they all seem terribly incomplete. To the point where I seriously question whether anyone actually hosts WordPress sites in real life using those guides. I’m jumping ahead here, but the most egregious example is that none of them fully address user permissions and the wp-content directory. They either:
- Have you run entirely in-container. Meaning that any themes or plugins that you install are entirely ephemeral, and get blown away when the container is deleted. Or worse yet, still have config in the database that is broken because the files no longer exist.
- Have you mount your
wp-contentdirectory from somewhere on the host filesystem. Which is likely to be a problem, because the Apache code in the WordPress container expects this directory to be owned by userwww-data(UID 33). This probably WON’T be the case on your host filesystem, where this user probably won’t exist with that UID. I don’t know if such tutorials even test their config, because the only way you could make that work is by expanding the file permissions for yourwp-contentdirectory to a terribly unsafe level. - If you’re lucky, then a tutorial might call for creating a persistent Docker volume to mount as
wp-content. This IS a respectable solution to the problem, and when we get there I will present it as an option. However, you’ll have to take care to manage and periodically backup this volume. And recovery could be a bit more dubious if a hacker compromises its files. I prefer to keep my ownwp-contentcontents under source control with Git on the host filesystem. Periodically commiting changes, as I install or upgrade themes or plugins. That way, if there’s ever an issue, then I can simply rollback or revert to any Git commit I like.
My goals for this guide are to:
- Establish a system for bringing up a complete WordPress environment on a new virtual machine. Including a MySQL database and a WordPress installation.
- Have a way to access your MySQL database, for management tasks and backups.
- Have a way to recover from compromise or corruption to the contents of your
wp-contentdirectory.
Step One: Install Docker and Docker Compose
Obviously, to run a Docker-based environment, the first thing you’ll need is to have Docker installed. This is highly dependent on which OS and distribution you are using. There are so many specific guides out there, I’m not going to really bring anything new to the table for this particular step.
I’ll just say that if you’re running Ubuntu Linux on a DigitalOcean droplet (one of the most common personal cloud hosting setups out there today), then I recommend this tutorial from the DigitalOcean community. For any other setup, you should refer to the official Docker documentation.
Next, you will want to install Docker Compose. In a larger scale business application environment, you would likely have something like Kubernetes. An “orchestration” system, that manages which Docker containers are running, and ensures secure network access between each container and the others on which it depends. Docker Compose is a tremendously simplified version of this “orchestration” concept, suitable for containers running on a single machine.
As with Docker itself, there are already a world of tutorials out there covering this installation step for your particular OS and distribution. If you’re running Ubuntu on DigitalOcean, then I recommend this one. For all other environments, follow the official guide.
Either way, you’ll find that the tutorial calls for you to run a command that downloads a specific version of Docker Compose. You’ll always want the latest release, but the version number that you see in the tutorial might be out of date. So be sure to look at the “Releases” page on Compose’s GitHub project, and use the latest number if it is different.
With Docker and Docker Compose installed, I recommend creating a central directory for storing your config file, filesystem mounts, etc. This could be somewhere system-wide, such as underneath /usr/local or /opt. But I recommend placing it under the home directory of whichever user account will be running the Docker commands:
myuser@myhost:/$ cd
myuser@myhost:~$ mkdir docker
myuser@myhost:~$ cd docker
myuser@myhost:~/docker$ touch docker-compose.yml
Step Two: Setup a Database
With our Docker dependencies installed, we will start by creating a MySQL database server. When I started out, I already had a MySQL instance installed at the host system level. At first, I was pretty reluctant to containerize that. I worried that backups would be difficult, that it would be too easy to accidentally delete the data, and that I wouldn’t be able to connect to the database from outside of Docker.
However, as I grew more comfortable with the tooling, I came around and see why most tutorials do it this way. For one thing, it’s actually quite easy to connect to a Docker-based MySQL instance from outside of Docker. So I’m just as free to connect from elsewhere as I ever was. Secondly, although connecting from host-to-container is quite easy, it’s MUCH more hassle to connect from a container to a port on your host system! I did get it working, and so if there is demand then I can document that in a separate post. But here, my recommendation is to run your MySQL service as a Docker container.
In your favorite text editor, open the docker-compose.yml file that we just created in the previous step. Populate it with the following:
version: "3.9"

services:
  db:
    image: mysql:8.0.23
    ports:
      - 3306:3306
    volumes:
      - db_data:/var/lib/mysql
    restart: always
    environment:
      MYSQL_ROOT_PASSWORD: this-is-the-mysql-root-user-password
      MYSQL_DATABASE: wordpress
      MYSQL_USER: wordpress
      MYSQL_PASSWORD: this-is-the-wordpress-user-password

volumes:
  db_data: {}
Some items to note here:
- Environment variables / security
- The
MYSQL_ROOT_PASSWORDenvironment variable establishes a password for the MySQL “root” user (which is a different concept from the operating system’s “root” user!). Obviously, you want to replace the text above with a real password. - The remaining environment variables (i.e.
MYSQL_DATABASE,MYSQL_USER, andMYSQL_PASSWORD) declare the name of a schema that will be automatically created for WordPress on startup, and a user-level account with access to this schema for WordPress to use. Of course, you will want to replace this password with something real, also. You don’t HAVE to use “wordpress” as the schema and user name. If you use something else, just make sure to remember that so you can use the same value later when we setup WordPress. - Declaring those last three variables causes the container to automatically create a schema and user account for you upon startup. If you’re only using this MySQL instance for WordPress, then this is the easiest path. However, if you plan to use this MySQL instance for multiple things, then you may or may not want to omit those last three variables, and handle all of the schema and user account setup manually yourself. Either way, I’ll explain in a bit how to connect to this database instance and perform such management tasks.
- The
- Ports / connectivity
- I am exposing port 3306, because I WANT the ability to connect to this MySQL instance from outside of my WordPress container. However, this is optional! If you DON’T necessarily want this ability, then you can remove this “ports” section after you’re fully setup. Your WordPress container will still be able to connect to this MySQL instance just fine. However, we WILL need to connect from the host during this initial setup, so you’ll need this section at least for the moment.
- Inside of the container, MySQL runs on port 3306 (its default). Here, I am mapping the container’s port 3306 to the host machine’s port 3306. These numbers don’t HAVE to be the same. You could map to the host’s port 3307 by changing this to
3307:3306, or map to any other available port you like. This might be a desirable option if you already have a MySQL instance running on port 3306 that you want to keep, or if you just want to use a non-default port for a bit of obfuscation. However, taking the default can make life a little easier.
- Data volumes
- The
volumessection is not strictly necessary, because the MySQL container will create its own Docker volume for storing data regardless. However, explicitly creating a volume and linking it is helpful. Because when you use Docker commands to list and manage volumes, you’ll see an easily-recognizable name rather a string of random characters.
- The
With this config now in place, make sure you’re still in this ~/docker directory, and run the following command:
myuser@myhost:~/docker$ docker-compose up -d
Without any other filename specified, Docker Compose will look for and use a docker-compose.yml file in the current directory. The up command tells it to create and/or launch all of the services and resources declared in this file, and the -d flag tells it to do so in the background as a detached process. If you forget this flag, then Docker Compose will run in the foreground, and all your services will be stopped when you exit the process or close your shell.
If this will be a brand-new, first-time WordPress installation, then you are done and can skip ahead to the next step! If you need to migrate data from an existing installation, or want to learn how to connect and perform other MySQL management tasks, then read on.
Here, I will show how to establish a connection to your new database from MySQL Workbench. I figure that if you’re already comfortable using the raw MySQL command-line client, then you wouldn’t need much guidance here!
Hopefully, your machine should be locked down with a firewall, so that the ONLY ports exposed are for SSH and HTTP traffic (i.e. ports 22, 80, and 443). It is a TERRIBLE idea to expose your MySQL port 3306 to the open Internet! Fortunately, MySQL Workbench makes it easy to connect to a properly locked-down database instance, through an SSH tunnel.
Just create a new connection, mimicking the screenshot below. The idea here is that you are creating an SSH connection with an OS-level username and password, and then connecting from there with a MySQL-level username and password.
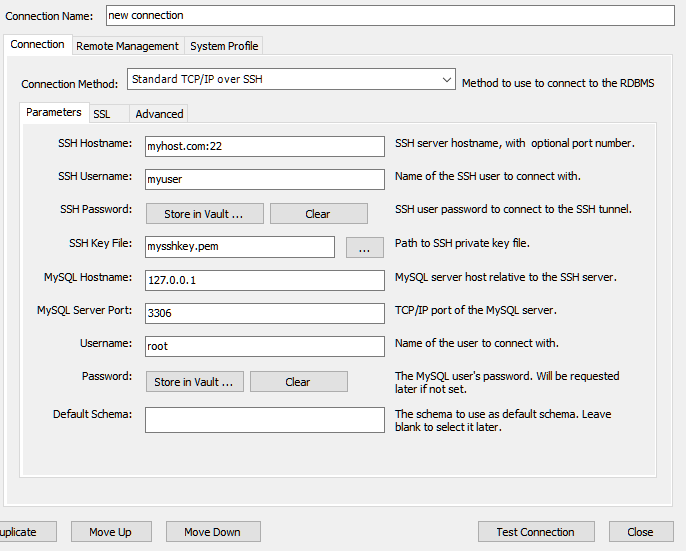
These first few boxes at the top will get your machine’s hostname or IP address, your username on the machine (probably the same account you’re running Docker Compose with), and your SSH key for connecting to that machine. Most cloud providers either give you an option to setup SSH access when creating your virtual machine, or else require it by default.
The boxes near the bottom are for connection info to MySQL, after the SSH tunnel has been established. You’ll be on the same machine, so use localhost or 127.0.0.1 for the hostname. And then the port and username should match whatever you declared in your docker-compose.yml file.
Once connected, it’s easy to migrate data from another database. Connect to your old database, and run an export from the “Server -> Data Export” menu option. Then open your newly-created database connection, and use the “Server -> Data Import” menu option.
If you chose to create your WordPress schema and database user manually, rather than doing it through your docker-compose.yml file, then this is easy with an open connection. Create the schema by executing the following in an SQL tab:
CREATE DATABASE `wordpress`
Then create a user account with access only to this schema. On the left-hand side of the window, click to switch from the “Schemas” to the “Administration” tab. Under “Users and Privileges”, add a new account with whichever username (e.g. wordpress) and password you like. In the “Limit to Hosts Matching” box, be sure to make this the % wildcard character. Even though WordPress will be connecting from the same machine as MySQL, Docker’s networking is such that the connections won’t be recognized as coming from localhost or 127.0.0.1. However, you should be secure from malicious outside connections, so long as the host operating system is locked down to only allow SSH tunnel connections with a private key.
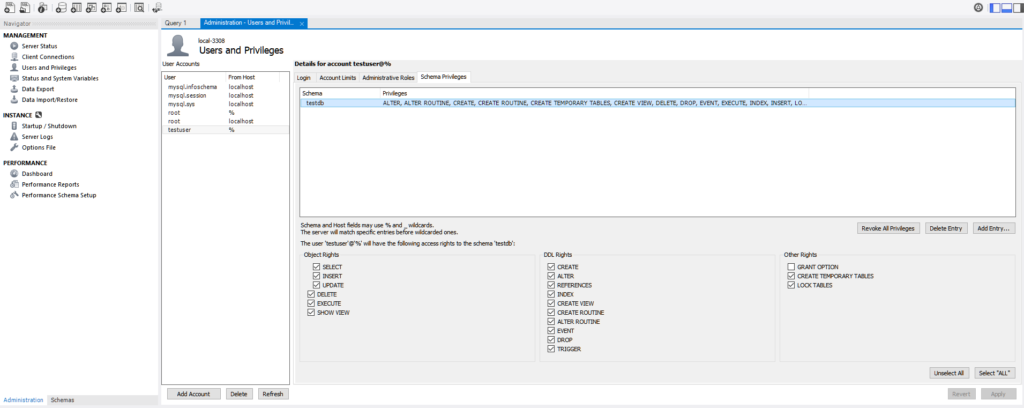
With the user account created, switch to the “Schema Privileges” tab. Click “Add Entry”, to give the user access to your WordPress schema. Then give it permissions, by clicking to highlight the schema and clicking the ‘Select “ALL”‘ button at the bottom-right. There are quote marks around “ALL”, because it’s not quite giving all permissions to the user. You’ll notice that it still withholds the “GRANT OPTIONS” checkbox, because we really only want the MySQL root user to have the ability to grant permissions to other users.
Step Three: Setup WordPress
Now that we have a database, let’s create a WordPress installation to use it. Once again, open your ~/docker/docker-compose.yml file in your favorite text editor, and update it to mimic this:
version: "3.9"

services:
  db:
    image: mysql:8.0.23
    ports:
      - 3306:3306
    volumes:
      - db_data:/var/lib/mysql
    restart: always
    environment:
      MYSQL_ROOT_PASSWORD: this-is-the-mysql-root-user-password
      MYSQL_DATABASE: wordpress
      MYSQL_USER: wordpress
      MYSQL_PASSWORD: this-is-the-wordpress-user-password

  wordpress:
    depends_on:
      - db
    image: wordpress:latest
    user: 1002:1002
    ports:
      - 8080:80
    restart: always
    environment:
      WORDPRESS_DB_HOST: db
      WORDPRESS_DB_NAME: wordpress
      WORDPRESS_DB_USER: wordpress
      WORDPRESS_DB_PASSWORD: this-is-the-wordpress-user-password
    volumes:
      - type: bind
        source: /home/myuser/docker/mywordpress/wp-content/
        target: /var/www/html/wp-content

volumes:
  db_data: {}
Quite a bit to unpack here:
- The
depends_onsection tells Dockers that your WordPress container must have the MySQL container created before it can function. It also sets up that container name (db) as a virtual host. This is how “db” can then work as a hostname, when passed to the WordPress container through theWORDPRESS_DB_HOSTenvironment variable below. - It’s generally not a recommended practice to pin the
imageto thelatesttag. Which is why the MySQL image uses a specific version. However, I think it’s appropriate to uselatestfor this WordPress image, as we’ll be pulling the latest version every time a security update is released (see the “Ongoing Management” section at the bottom). - The
usersetting is perhaps the most important line in this article. I haven’t found this covered in any other tutorial out there!- I’ve already discussed this a bit in the “Introduction” section at the top, but the purpose of this setting is to tell the WordPress container which user should run its Apache web server process. Otherwise, Apache would be running under a
www-datauser that likely doesn’t even exist on your host machine (or might not have the same numeric UID even if it is there). - By setting this to a user who exists on your host system, you will be able to cleanly bind a filesystem mount for the
wp-contentdirectory (i.e. the place where WordPress stores your themes, plugins, and any images or other media that you upload). You won’t have to loosen the file permissions to an unsafe level, or attempt any other hacky workarounds. - The only hassle is that this user setting does not take the username. Instead, it takes the numeric ID for a user and group (probably the same number), separated by a colon. In example above, it’s
1002:1002. Look in your host system’s/etc/passwordfile, to find the user and group ID for your username.
- I’ve already discussed this a bit in the “Introduction” section at the top, but the purpose of this setting is to tell the WordPress container which user should run its Apache web server process. Otherwise, Apache would be running under a
- The
portssetting can map however you like. The WordPress container runs its Apache process on port80, and here I am mapping that to port8080on the host machine. You can map to any other host port instead, just remember it when you setup the NGINX proxy in the next step. - It’s probably obvious, but the database information in the
environmentvariables section should match that in the MySQL container above. Use the regular user account that was created for the WordPress schema, not the MySQL “root” user.
Lastly, the volumes section contains a bind mount for your wp-content directory. If you want to keep things simple, then you could omit this, and let your contents be ephemeral. Or if you plan to install themes or plugins, or upload images or media that you want to be preserved, then you could create a regular Docker volume like we’ve done with db_data.
However, I recommend making your wp-content directory a bind mount, so that you can keep it in source control. The advantage here is that if you are ever hacked or compromised, or simply corrupt your content somehow, you can revert back to a known state. You could also do this by taking regular backups and restoring from a Docker volume. But by having your themes, plugins, and media in source control, it’s easier to track what exactly has changed in the event of a compromise.
To follow the example in the docker-compose.yml file above, cd to your ~/docker directory and create a new directory beneath it named wordpress (or whatever name you like). Create a wp-content directory beneath that. If you are migrating an existing WordPress site, then go ahead and copy its wp-content contents into this new location. Otherwise, the WordPress container will populate it for you when you start it up for the first time.
Proceed onward for now, as we haven’t fired up WordPress yet. But once WordPress is running, come back to make sure your wp-content is under source control. Assuming that Git is installed on your host machine, you will run the following commands:
myuser@myhost:~$ cd ~/docker/wordpress
myuser@myhost:~/docker/wordpress$ git init
myuser@myhost:~/docker/wordpress$ git add -A
myuser@myhost:~/docker/wordpress$ git commit -m "Initial commit of wp-content"
Step Four: Setup NGINX Proxy
WordPress is ready to roll now, but it’s using port 8080 (or whatever other port you chose). If your host machine has a well-configured firewall, then this port won’t even be exposed to the open Internet. We’ll need to set up a proxy, to expose it on the regular HTTP and HTTPS ports (i.e. 80 and 443). The most common choice these days, and my own preference, is NGINX.
Up until this point, we have been going out of our way to make everything a Docker container. At one point, I experimented with doing this for the NGINX proxy also. However, I have come around on this, and now believe that the proxy server should be the boundary line between the host machine and the Docker container world. This excellent blog post from Nick Janetakis lays out a number of great reasons for this. But for me, the main reason is that SSL certificate management with Let’s Encrypt (our next step) is a bit of a nightmare when your proxy server runs in a Docker container!
If NGINX is not already installed on your host system, then install it with the normal system tooling (e.g. sudo apt install nginx on Ubuntu Linux). The layout of NGINX’s config files can vary from one Linux distribution to the next. However, on an Ubuntu host, you would use sudo to create a new file in the /etc/nginx/sites-available directory. The example here will be named mydomain.com, but you would choose a filename matching the domain name on which you’ll be hosting your site. Edit the file to look like this:
server {
        location / {
                proxy_set_header   X-Forwarded-For $remote_addr;
                proxy_set_header   Host $http_host;
                proxy_pass         "http://127.0.0.1:8080";
        }
        listen 80;
        server_name mydomain.com;
}
This establishes an initial configuration for your site, but does not make it active. To enable this entry (on Ubuntu, anyway), make a symbolic link for it in the sites-enabled directory and then restart the NGINX service:
myuser@myhost:~$ sudo ln -s /etc/nginx/sites-available/mydomain.com /etc/nginx/sites-enabled/mydomain.com
myuser@myhost:~$ sudo service nginx restart
Step Five: Enable SSL with Let’s Encrypt
You could stop here, and visit http://mydomain.com to setup your WordPress site with an unencrypted “http” URL. However, this would be bad form on the modern web, where browsers have become “https” by default. Fortunately, the non-profit certificate authority Let’s Encrypt makes it fairly easy to get up and going with a completely free SSL certificate.
You could do all of this by hand if you’re a masochist. But today, I would recommend using Certbot, a free tool from the Electronic Frontier Foundation that automates the process of obtaining a Let’s Encrypt certificate (and automatically renewing it when it comes up for renewal). On the main Certbot landing page, there are pulldowns for indicating the software on which your website runs:

Select NGINX on Ubuntu (or whichever OS / distribution you are running), and the site will take you to detailed instructions for installing and running Certbot on your system. Once you are done, the NGINX config file for your WordPress site should look something more like this:
server {
        server_name mydomain.com;

        location / {
                proxy_set_header   X-Forwarded-For $remote_addr;
                proxy_set_header   X-Forwarded-Proto https;
                proxy_set_header   Host $http_host;
                proxy_pass         "http://127.0.0.1:8080";
        }

    listen 443 ssl; # managed by Certbot
    ssl_certificate /etc/letsencrypt/live/mydomain.com-0001/fullchain.pem; # managed by Certbot
    ssl_certificate_key /etc/letsencrypt/live/mydomain.com-0001/privkey.pem; # managed by Certbot
    include /etc/letsencrypt/options-ssl-nginx.conf; # managed by Certbot
    ssl_dhparam /etc/letsencrypt/ssl-dhparams.pem; # managed by Certbot
}

server {
    if ($host = mydomain.com) {
        return 301 https://$host$request_uri;
    } # managed by Certbot

        listen 80;
        server_name mydomain.com;
    return 404; # managed by Certbot
}
If the location block in your port 443 server block does NOT contain these three proxy_set_header settings, then be sure to add them. Inside your Docker container, WordPress will be running on plain, port-80 “http”. These settings will help WordPress understand that a proxy server is doing the SSL handling, so WordPress won’t get confused when you configure your URL to start with “https”.
Ongoing Management
Congratulations! At this point, you should be able to visit your WordPress site, and perform any initialization necessary in its admin console. You now have a MySQL database and WordPress web application, which will be launched automatically by the Docker service daemon every time your host machine starts up.
If you ever want to take your site down temporarily for whatever reason, then from your ~/docker directory you can simply execute docker-compose down. To bring it back up, run docker-compose up -d.
Occasionally, the WordPress admin console will prompt you to update themes or plugins (and you may also decide to install new ones). After you’ve done so, then don’t forget to commit your wp-content changes to source control:
myuser@myhost:~$ cd ~/docker/wordpress
myuser@myhost:~/docker/wordpress$ git add -A
myuser@myhost:~/docker/wordpress$ git commit -m "Updated the 'Akismet Spam Protection' plugin and installed the 'Twenty Twenty-One' theme"
Eventually, WordPress itself will have a new update available. Since your WordPress system is in an ephemeral Docker container, don’t bother updating WordPress from its admin console. Instead, just update the Docker image from a terminal shell:
myuser@myhost:~$ cd ~/docker
myuser@myhost:~/docker$ docker-compose pull
myuser@myhost:~/docker$ docker-compose down
myuser@myhost:~/docker$ docker-compose up -d
I’ve seen reports that you can use the docker-compose restart command after a pull, to avoid the need for a full down and up. Feel free to experiment with this. However, even in the worst case above, you’re still only looking at a couple seconds of downtime at most.
Periodically, it would be a good idea to take a backup of your database schema. You can use MySQL Workbench or the MySQL command-line client for this, or just backup the db_data Docker volume itself. Note that because we keep our docker-compose.yml file in a ~/docker directory, Docker Compose will probably prefix our container and volume names with docker_ (i.e. our db_data volume is actually named docker_db_data). Run a docker volume ls command to confirm.
There’s certainly a ton of information here! But hopefully breaking it down step-by-step makes it less overwhelming. The advantages you now have here are:
- No need to have PHP installed on your host system at all! Your vulnerable attack surface just shrank considerably.
- No need to install and manage Apache, or jump through all of the hoops necessary to make WordPress work directly with NGINX.
- Increased defense against hackers, and easier recovery if your site is compromised.
- Much harder to completely foobar your website, by experimenting with different plugins or themes. If you get yourself in trouble, just blow away and re-create your WordPress container, and/or restore your
wp-contentdirectory from a previous commit. - Easier to move between hosting providers, or to a new machine with your current hosting provider. Just take a database export, push your
wp-contentrepo to GitHub or GitLab or wherever, and repeat these steps on your next box.
Happy hosting!